Jersey Restful JPA toplink example using Maven and netbeans6.1
I could have done the whole thing with the netbeans6.1 wizard for restful webservices , but it was too much of magic for me , so thought of going step by step myself for better understanding of the jersey and restful.
I used netbeans6.1, JPA with toplink and mysql as my database.
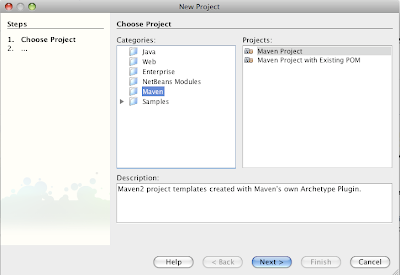
Step 1. Create a Maven project with netbeans(Make sure you the maven plugin is installed in netbeans).

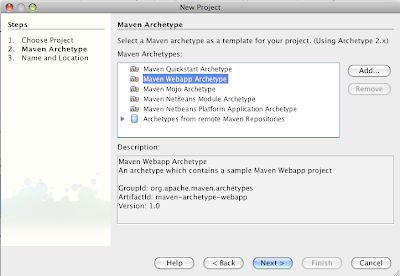
Step 2. Select the Maven Webapp Archetype

Step 3. Name your project (i named it as restMaven)

Step 4. Click Finish and then open pom.xml from the project files folder, edit the pom.xml by adding the dependencies as shown.
<?xml version="1.0" encoding="UTF-8"?>
<project xmlns="http://maven.apache.org/POM/4.0.0" xmlns:xsi="http://www.w3.org/2001/XMLSchema-instance" xsi:schemaLocation="http://maven.apache.org/POM/4.0.0 http://maven.apache.org/maven-v4_0_0.xsd">
<modelVersion>4.0.0</modelVersion>
<groupId>com.mani</groupId>
<artifactId>restMaven</artifactId>
<packaging>war</packaging>
<version>1.0-SNAPSHOT</version>
<name>restMaven Maven Webapp</name>
<url>http://maven.apache.org</url>
<dependencies>
<dependency>
<groupId>jersey</groupId>
<artifactId>jersey</artifactId>
<version>0.5-ea</version>
</dependency>
<dependency>
<groupId>javax.xml.bind</groupId>
<artifactId>jaxb-api</artifactId>
<version>2.1</version>
</dependency>
<dependency>
<groupId>com.sun.xml.bind</groupId>
<artifactId>jaxb-impl</artifactId>
<version>2.0.3</version>
</dependency>
<dependency>
<groupId>javax.annotation</groupId>
<artifactId>jsr250-api</artifactId>
<version>1.0</version>
<scope>provided</scope>
</dependency>
<dependency>
<groupId>javax.persistence</groupId>
<artifactId>persistence-api</artifactId>
<version>1.0.2</version>
<scope>provided</scope>
</dependency>
<dependency>
<groupId>javax.servlet</groupId>
<artifactId>servlet-api</artifactId>
<version>2.5</version>
<scope>provided</scope>
</dependency>
<dependency>
<groupId>asm</groupId>
<artifactId>asm</artifactId>
<version>3.1</version>
</dependency>
<dependency>
<groupId>toplink.essentials</groupId>
<artifactId>toplink-essentials-agent</artifactId>
<version>2.0-36</version>
</dependency>
<dependency>
<groupId>toplink.essentials</groupId>
<artifactId>toplink-essentials</artifactId>
<version>2.0-36</version>
</dependency>
</dependencies>
<repositories>
<repository>
<id>javamaven2</id>
<name>Repository for Maven2</name>
<url>http://download.java.net/maven/2/</url>
</repository>
<repository>
<id>toplink</id>
<name>Repository for library Library[toplink]</name>
<url>http://download.java.net/maven/1</url>
<layout>legacy</layout>
</repository>
</repositories>
<build>
<finalName>restMaven</finalName>
<plugins>
<plugin>
<artifactId>maven-compiler-plugin</artifactId>
<version>2.0.2</version>
<configuration>
<source>1.5</source>
<target>1.5</target>
</configuration>
</plugin>
</plugins>
</build>
</project>
Step 5. Right click on project and do clean and build , maven will download and build will be successful.
Step 6. Edit the web.xml as follows , the servlet adaptor from previous release is removed and you no longer need to register your resource classes. The only thing you have to make sure is , mention the right package where your resource classes are (i put them under package called service).
<?xml version="1.0" encoding="UTF-8"?>
<!DOCTYPE web-app PUBLIC "-//Sun Microsystems, Inc.//DTD Web Application 2.3//EN" "http://java.sun.com/dtd/web-app_2_3.dtd">
<web-app>
<servlet>
<servlet-name>Jersey</servlet-name>
<servlet-class>com.sun.ws.rest.spi.container.servlet.ServletContainer</servlet-class>
<init-param>
<param-name>com.sun.ws.rest.config.property.resourceConfigClass</param-name>
<param-value>com.sun.ws.rest.api.core.PackagesResourceConfig</param-value>
</init-param>
<init-param>
<param-name>com.sun.ws.rest.config.property.packages</param-name>
<param-value>service</param-value>
</init-param>
<load-on-startup>1</load-on-startup>
</servlet>
<servlet-mapping>
<servlet-name>Jersey</servlet-name>
<url-pattern>/*</url-pattern>
</servlet-mapping>
</web-app>
Step 7.Create Persistence unit for accessing the db.

Step 8. Leave the default toplink persistence library, give the db connection , i used mysql, also make sure u placed the mysql jdbc jar under server lib in tomcat.

Step 9. Create Entity Classes from Database as shown.


Step 10. The generated person entity looks as follows

Step 11. Create a new package for your resource class i named it service.

Step 12. The resource class looks like shown below.

Nothing fancy in the above class, its accessing the persistence unit to retrieve the data from db in the method getTest(). The catch are the annotations the @GET , @ProduceMime(“text/plain”) and @Path(“/person/”);
Step 13. Access the data through the URL (http://localhost:8080/restMaven/person/ ) after clean and build and deploying on the server. Mine looked as below

Conclusion: In this example i just sticked to html output maybe in my next post i will try to get the xml output and also may be generating the URIs for accessing the resource as done by the netbeans restful wizard.